Android 滚动操作Scroller类详解

2012-12-02 22:40 730 0
Scroller这个类理解起来有一定的困难,刚开始接触Scroller类的程序员可能无法理解Scroller和View系统是怎么样联系起来的。我经过自己的学习和实践,对Scroller的用法和工作原理有了一定的理解,在这里和大家分享一下,希望大家多多指教。
首先从源码开始分析:
View.java
/**
 * Called by a parent to request that a child update its values for mScrollX
 * and mScrollY if necessary. This will typically be done if the child is
 * animating a scroll using a {@link android.widget.Scroller Scroller}
 * object.
 */
public void computeScroll()
{
}
computeScroll是一个空函数,很明显我们需要去实现它,至于做什么,就由我们自己来决定了。
因为View的子类很多,在下面的例子中,我会在一个自定义的类MyLinearLayout中去实现它。
ViewGroup.java
@Override
  protected void dispatchDraw(Canvas canvas) {
              .......
              .......
              .......
              .......
              for (int i = 0; i < count; i++) {
              final View child = children\[i\];
              if ((child.mViewFlags & VISIBILITY_MASK) == VISIBLE || child.getAnimation() != null)
              {
                  more |= drawChild(canvas, child, drawingTime);
              }
              .......
              .......
              .......
}
从dispatchDraw函数可以看出,ViewGroup会对它的每个孩子调用drawChild(), 在下面的例子中, ContentLinearLayout的孩子有2个,是2个MyLinearLayout类型的实例。
再看看drawChild函数:
protected boolean drawChild(Canvas canvas, View child, long drawingTime) {
            ................
            ................
           child.computeScroll();
            ................
            ................
}
看到这里,我想大家应该就明白了,在父容器重画自己的孩子时,它会调用孩子的computScroll方法,也就是说例程中的ContentLinearLayout在调用dispatchDraw()函数时会调用MyLinearLayout的computeScroll方法。
这个computeScroll()函数正是我们大展身手的地方,在这个函数里我们可以去取得事先设置好的成员变量mScroller中的位置信息、速度信息等等,用这些参数来做我们想做的事情。
看到这里大家一定迫不及待的想看代码了,代码如下:
package com.yulongfei.scroller;
import android.widget.LinearLayout;
import android.widget.Scroller;
import android.app.Activity;
import android.content.Context;
import android.graphics.Canvas;
import android.os.Bundle;
import android.util.Log;
import android.view.View;
import android.widget.Button;
import android.view.View.OnClickListener;
public class TestScrollerActivity extends Activity {
 private static final String TAG = "TestScrollerActivity";
    LinearLayout lay1,lay2,lay0;
     private Scroller mScroller;
    @Override
    public void onCreate(Bundle savedInstanceState) {
        super.onCreate(savedInstanceState);
        mScroller = new Scroller(this);
        lay1 = new MyLinearLayout(this);
        lay2 = new MyLinearLayout(this);
        lay1.setBackgroundColor(this.getResources().getColor(android.R.color.darker_gray));
        lay2.setBackgroundColor(this.getResources().getColor(android.R.color.white));
        lay0 = new ContentLinearLayout(this);
        lay0.setOrientation(LinearLayout.VERTICAL);
        LinearLayout.LayoutParams p0 = new LinearLayout.LayoutParams
        (LinearLayout.LayoutParams.FILL_PARENT,LinearLayout.LayoutParams.FILL_PARENT);
        this.setContentView(lay0, p0);
        LinearLayout.LayoutParams p1 = new LinearLayout.LayoutParams
        (LinearLayout.LayoutParams.FILL_PARENT,LinearLayout.LayoutParams.FILL_PARENT);
        p1.weight=1;
        lay0.addView(lay1,p1);
        LinearLayout.LayoutParams p2 = new LinearLayout.LayoutParams
        (LinearLayout.LayoutParams.FILL_PARENT,LinearLayout.LayoutParams.FILL_PARENT);
        p2.weight=1;
        lay0.addView(lay2,p2);
        MyButton btn1 = new MyButton(this);
        MyButton btn2 = new MyButton(this);
        btn1.setText("btn in layout1");
        btn2.setText("btn in layout2");
        btn1.setOnClickListener(new OnClickListener(){
            @Override
            public void onClick(View v) {
                    mScroller.startScroll(0, 0, -30, -30, 50);
                }
        });
        btn2.setOnClickListener(new OnClickListener(){
            @Override
            public void onClick(View v) {
                    mScroller.startScroll(20, 20, -50, -50, 50);
                }
        });
        lay1.addView(btn1);
        lay2.addView(btn2);
    }
    class MyButton extends Button
    {
     public MyButton(Context ctx)
     {
      super(ctx);
     }
     @Override
     protected void onDraw(Canvas canvas)
     {
      super.onDraw(canvas);
      Log.d("MyButton", this.toString() + " onDraw------");
     }
    }
    class MyLinearLayout extends LinearLayout
    {
     public MyLinearLayout(Context ctx)
     {
      super(ctx);
     }
     @Override
        /**
         * Called by a parent to request that a child update its values for mScrollX
         * and mScrollY if necessary. This will typically be done if the child is
         * animating a scroll using a {@link android.widget.Scroller Scroller}
         * object.
         */
        public void computeScroll()
     {
    Log.d(TAG, this.toString() + " computeScroll-----------");
    if (mScroller.computeScrollOffset())//如果mScroller没有调用startScroll,这里将会返回false。
    {
        //因为调用computeScroll函数的是MyLinearLayout实例,
     //所以调用scrollTo移动的将是该实例的孩子,也就是MyButton实例
        scrollTo(mScroller.getCurrX(), 0);
        Log.d(TAG, "getCurrX = " +  mScroller.getCurrX());
        //继续让系统重绘
        getChildAt(0).invalidate();
    }
     }
    }
    class ContentLinearLayout extends LinearLayout
    {
     public ContentLinearLayout(Context ctx)
     {
      super(ctx);
     }
     @Override
     protected void dispatchDraw(Canvas canvas)
     {
      Log.d("ContentLinearLayout", "contentview dispatchDraw");
      super.dispatchDraw(canvas);
     }
    }
}
对代码做一个简单介绍:
例子中定义了2个MyButton实例btn1和btn2,它们将被其父容器MyLinearLayout实例lay1和lay2通过调用scrollTo来移动。
ContentLinearLayout实例lay0为Activity的contentview,它有2个孩子,分别是lay1和lay2。
mScroller是一个封装位置和速度等信息的变量,startScroll()函数只是对它的一些成员变量做一些设置,这个设置的唯一效果就是导致mScroller.computeScrollOffset() 返回true。
这里大家可能有个疑问,既然startScroll()只是虚晃一枪,那scroll的动态效果到底是谁触发的呢?
后面我将给出答案。
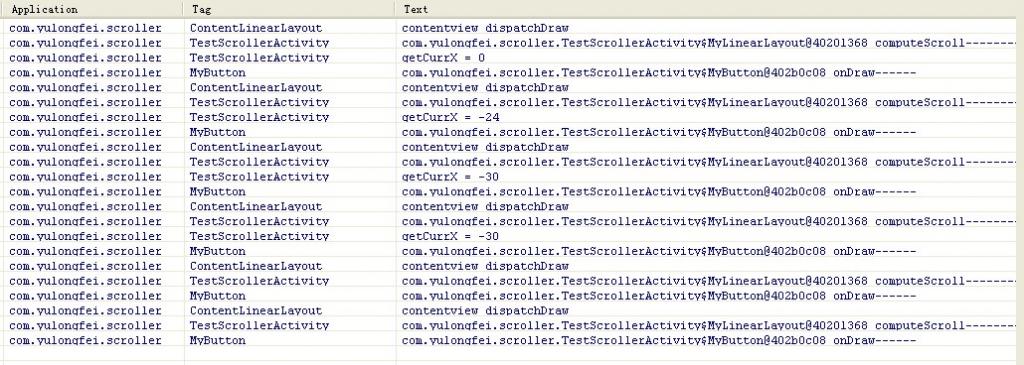
运行程序,我们来看看Log
点击btn1:
点击btn2:
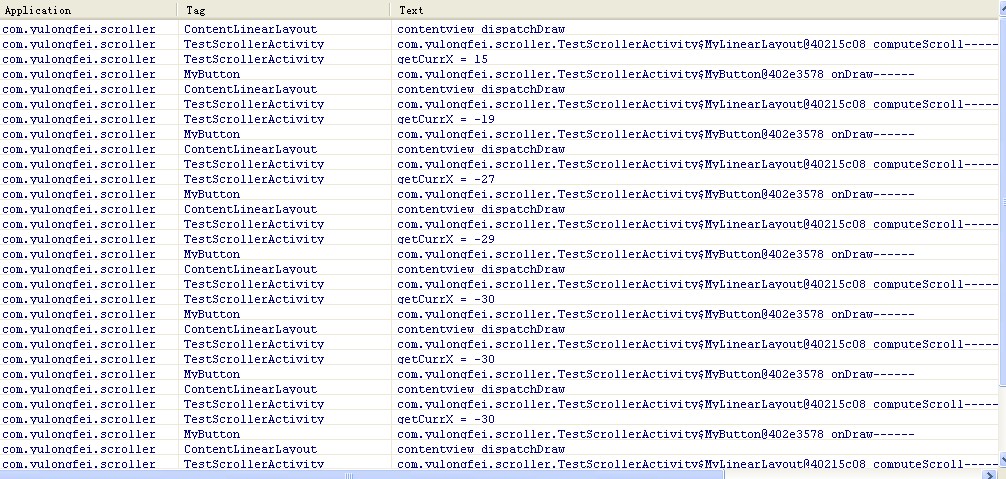
对照Log,我从button被点击开始,对整个绘制流程进行分析,首先button被点击(这里将回答上文的问题),button的背景将发生变化,这时button将调用invalidate()请求重绘,这就是View系统重绘的源头,即scroll动态效果的触发者。与此同时,mScroller.startScroll被调用了,mScroller在此时被设置了一些有效值。
好了,既然重绘请求已发出了,那么整个View系统就会来一次自上而下的绘制了,首先输出的Log就是“contentview dispatchDraw”了,它将绘制需要重绘的孩子(lay1和lay2中的一个),接着会调用drawChild,使得computeScroll函数被触发(drawChild里面会调用child.computeScroll()),于是,lay1或者lay2就会以mScroller的位置信息为依据来调用scrollTo了,它的孩子btn1或者btn2就会被移动了。之后又调用了getChildAt(0).invalidate(),这将导致系统不断重绘,直到startScroll中设置的时间耗尽mScroller.computeScrollOffset()返回false才停下来。
好了,现在整个流程都分析完了,相信大家应该清楚了Scroller类与View系统的关系了吧。理解了Scroller的工作原理,你会发现原来Scroller类并不神秘,甚至有点被动,它除了储存一些数值,什么其他的事情都没做,Scroller类中的一些变量mStartX, mFinalX, mDuration等等的意义也很好理解。
总结:
一、mScroller.startScroll 并不会导致 View 立即进行scroll,它只会导致当前 View 无效,从而重新绘制,在 View 被它的parent View 调用绘制的时候,它的 computeScroll 函数会被调用,所以会在computeScroll这个函数中让 View 调用 scrollTo 函数进行实际的移动。
mScroller 的纯粹是一个Model,根据Animation提供数据而已,如果希望改变滚动效果,例如快慢,回弹等,控制mScroller ,再读取它的数据处理界面.
二、scoller只是封装了将要滚动的操作,并不是立即执行的,执行了startScroll方法后,调用了父控件的computeScroll方法来执行的滚动操作,并且滚动并不是按钮的滚动,而是布局滚动,那么里面的所有子元素也会跟着滚动


